Tuesday, July 22, 2014

Income Tax e-Filing : On line method


Income Tax e-Filing : On line e-Filing method

If your income is less than Rs 5 lakh per annum, you can fill the ITR physically.  But if your income is more than that, it is mandatory to fill it electronically.      For electronic filing, you can fill it off line and upload the XML file. For this, download the relevant ITR form from the website, fill it offline, generate XML and save it on your desktop, register on e-filing website using your PAN, login to the portal, go to e-file-Income Tax Return-upload return.

Here I am trying to explain the online e-Filing method

Open the Income Tax e-filing website using the following address:
https://incometaxindiaefiling.gov.in/


See the services available in the website. By using 'View form 26 AS' you can see the payments done by the employer to IT department.
For your income tax ward, firstname , middle name, last name go thrgh the link : https://incometaxindiaefiling.gov.in/e-Filing/Services/KnowYourJurisdictionLink.html (services > Know your Jurisdictional AO)
If you are not a registered user, register first with the 'Register yourself' button. Otherwise log in with your username (PAN) and password.
Online e Filing
 
Click on 'e-File > Prepare and Submit on line ITR
Select the form name as ITR-1, select your the assessment year 2014-15( for the financial year 2013-14) , address selection and submit.


See the instructions .. click on 'Personal Information' 

Enter the personal information.. here income tax ward : for your income tax ward, firstname , middle name, last name go through the links : https://incometaxindiaefiling.gov.in/e-Filing/Services/KnowYourJurisdictionLink.html (services > Know your Jurisdictional AO)


click on next tab ie. 'Income Details' : Enter the income salary from the Form 16 (income chargeable under head salaries (3-5)): salary after the deduction of the hra exemption,prof.tax, conveyance etc. [ Sl.no.8 in the Form 16]

Enter the other deductions . Here it is in 80c (PF , LIC etc. ). Enter if any donation amounts in the corresponding heads... (80 GG,80 GGA, 80 TTA etc)
 
For entering the amount in the 80G, you have to enter the donee details in the last tab. (80G)
 see the TAX computation...it will get automatically...


click on 'Tax details' tab : see the Employer details like Employer name, TAN, tax deducted from the employee and paid to the Income Tax department [For checking the tax deducted from the employee click on 'View form 26AS' in the home page of the  website. ]
 
 
 click on 'Tax paid and verification' tab. Verify the calculated tax details. If you have refund can see the amount in  the refund field. Enter the Bank account details. 

 
Click on 80G and enter any external amount you have given as donation...Here you have to enter the Donee name, address, pan of donee and amount (if it is there in your 80G head). 
After save, it will reflect in the 80G of ' income details' tab.


now the process completed. Verify one more time. save and click on the submit button 


  Download the ITRV from the link or from your mail inbox. Take the printout, sign and send to the above mentioned address The ITR V you can open with the password as your PAN in small letters and DOB as ddmmyyyy format... 
 
 Thank u
 Rajesh


Tuesday, July 15, 2014

FIBCOM System in the Tx Network

Fibcom India Ltd. is the pioneer in design and manufacture of optical networking equipment and management systems in technical collaboration with Tellabs Denmark A/S. It is India's first company to set up local manufacturing and development facilities for latest SDH & DWDM fibre optic based products and Network Management solutions, propelling the broadband and convergence revolution in the country. FIBCOM has attained its dominant position for its SDH products in BSNL nation wide backbone network , MTNL metro networks in Delhi & Mumbai , VSNL, Indian Railways and also in other utility agencies like Oil and Gas. FIBCOM's high capacity optical telecom solutions are based on technology that provides switching, routing, grooming and restoration SDA and using DWDM products up to 10 Gbps and 32 channels or more.

The AC1 and AC4 are their product families (A – Add drop, C – Cross connect).The AC1 product family consists of STM–1 and STM–4 equipments, where as the AC4 type of equipments has STM–4 and STM–16 equipments. In the AC1 family ADM (Add–drop multiplexer) and TM (Terminal Multiplexer) along with the necessary cross connect functions are implemented in a single module. The same unit also incorporates sufficient dropping capacity, which is upgradable, to make a cost effective solution for small capacity networks. The system has protection facility and utilizes the inherent management capacities of SDH with a ‘Craft Terminal’ (nothing but a PC) or through a fully fledged Network Management System.


Open the 'NM 2100 Craft Terminal' software installed in the PC (the PC to OEO card (15th card) should be connected through the cable)
Local NE Access:
Click on the icon for local NE access and just give OK (for local system access no need of the NE address).
Below image shows the card details of the system. The ADM4 OEO card is the main card and also contains 21 E1s.
 
Remote NE Access:
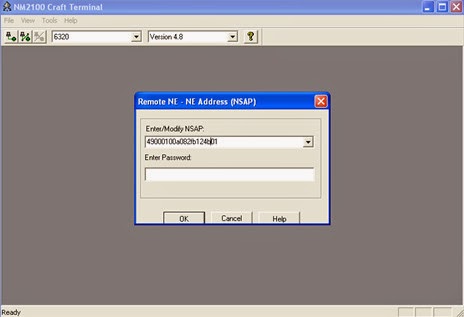
Click on the icon for Remote NE access and enter the NE address.


Click on 'Configuration' menu, here NE identification will show the System details.


Connections
Click on 'Configuration' > connections for cross connection.


The following image shows the cross connections. Here, the TM1 is used and other TMs are pass through. 63 E1s are dropped here. KLM values vary from 1-1-1 to 3-7-3. We can easily add and delete the connections by right click and select the corresponding commands.


Clock settings / Synchronisations
select the 'synchronisation' command from 'configuration' menu
Click on SDH and do the proper settings and apply.


Click on Selector A and Selector B for view and change the System clock settings. Selector C for external clock details


Local loop/ Remote loop
Click on 'Configuration' menu and give 'Termination points' command. Select 2MBit/s


Select the stream which you need to give loop. The details will be displayed on the right side.

Select 'line' for local loop, 'Terminal' for remote loop and 'off' for making normal.
 
Alarm Details
Click on Fault menu >> Alarm log will display the alarms and current problem list will display the current alarm details.
For checking Power / Temperature etc.
Click on 'Performance Monitoring' , Select the Optical scan
 
Expand the ports 1 and 2. Double on the Tx and Rx power level from left side to right side. Click on View data tab and Refresh